SAME DAY ESTIMATES AVAILABLE
CALL FOR A FREE ESTIMATE
(440) 457-7064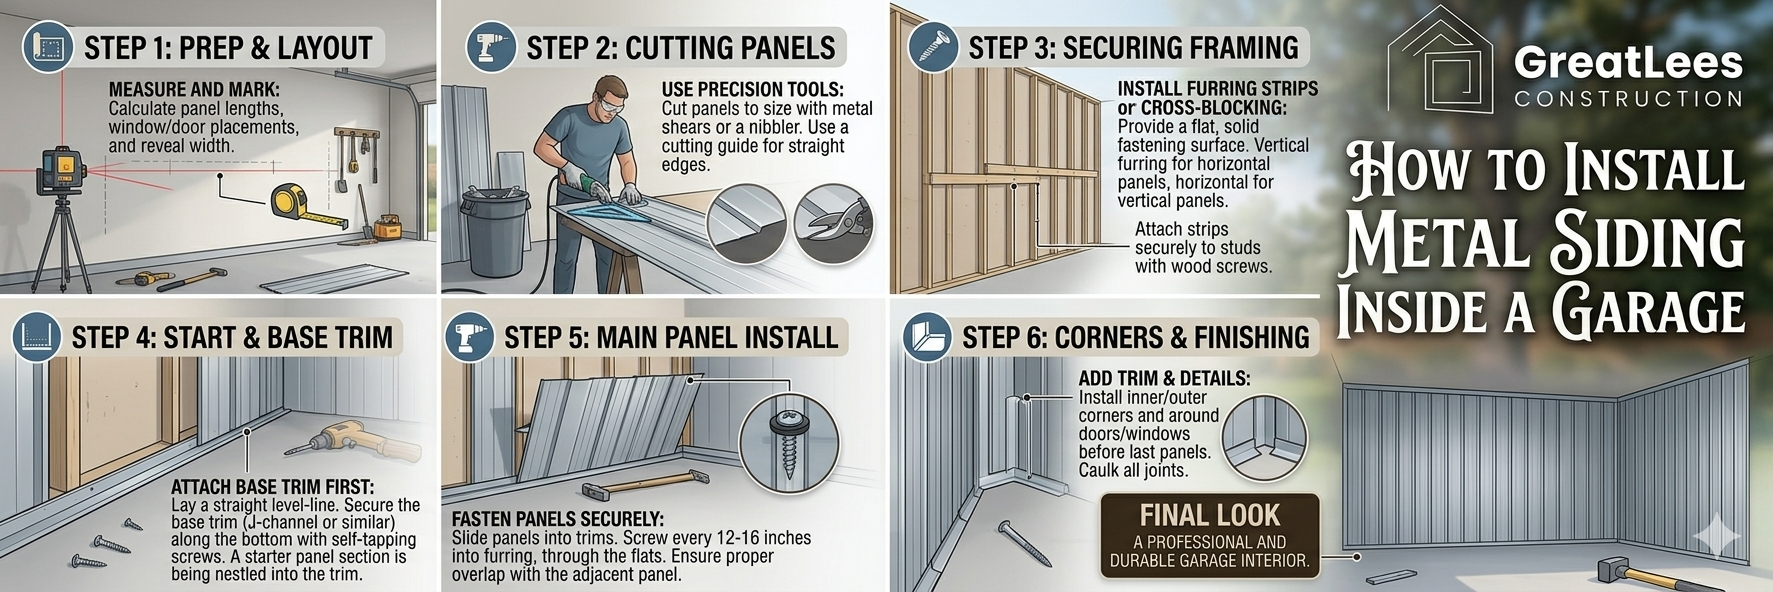
March 24, 2026
Installing metal siding inside a garage is a smart upgrade that adds durability, moisture resistance, and a clean, professional look. It’s especially useful for workshops, storage areas, or garages exposed to humidity and wear.
This detailed guide walks you through everything—from preparation to finishing—so you can install metal siding correctly and efficiently.
Before installation, it’s helpful to understand why metal siding is a great choice for interior garage walls.
It’s ideal for garages used as workshops or high-traffic spaces.
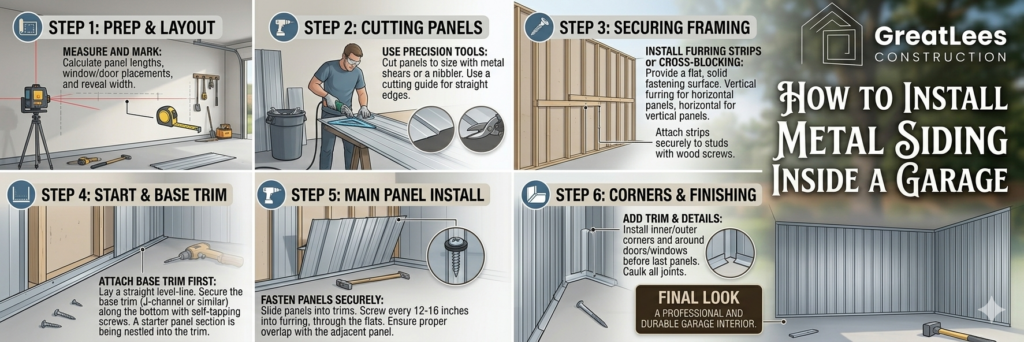
Proper preparation ensures a smooth and long-lasting installation.
Walls should be flat and dry before installing metal panels.
A vapor barrier prevents moisture buildup behind the metal siding.
This step is especially important in humid environments.
Furring strips create a flat surface and allow airflow behind panels.
Accurate cutting ensures a clean, professional finish.
Cut panels slightly shorter (about 1/4 inch) to allow expansion.
The first panel sets the alignment for the entire wall.
Do not overtighten screws—this can damage the panel.
Once the first panel is in place, continue across the wall.
Keep checking alignment to avoid uneven installation.
Trim pieces give the installation a finished look.
Final touches improve durability and appearance.
Choose based on your design preference.
Uneven surfaces lead to poor installation.
This can warp panels or damage washers.
Metal expands and contracts with temperature.
This affects the entire installation.
Always use screws designed for metal siding.
Metal siding is low maintenance, but a few steps help keep it in top condition:
You may want professional help if:
Installing metal siding inside a garage is a durable and practical upgrade that enhances both function and appearance. With proper preparation, accurate measurements, and careful installation, you can achieve a professional-quality result.
The key steps—preparing walls, installing panels correctly, and finishing with trim—ensure long-lasting performance. Whether you’re upgrading a workshop or improving your garage’s durability, metal siding is a reliable and worthwhile solution.
At Great Lees Construction, we design and build high-quality outdoor structures for homeowners across Ohio. Whether you need a durable garage, a practical storage shed, or a spacious barn, our team delivers expert craftsmanship and long-lasting materials.
Looking for strong and reliable garages? We build custom garages in Ohio that provide secure parking, extra storage, and long-term durability for your property.
Learn MoreNeed additional storage space? Our storage sheds in Ohio are perfect for tools, lawn equipment, and backyard organization while enhancing your property’s appearance.
Explore ShedsOur team specializes in building custom barns in Ohio designed for farming, livestock, equipment storage, and multi-purpose rural use.
View Barns
Veteran Owned & Operated Since 2017
4.1 Average Rating (31 Reviews)
17601 W 130th St Suite #4
North Royalton, OH 44133
Monday - Friday: 8:00 AM - 5:00PM